Git Notes

Last updated on December 24, 2024 pm

Git学习笔记

git version 2.37.0 (Apple Git-136)
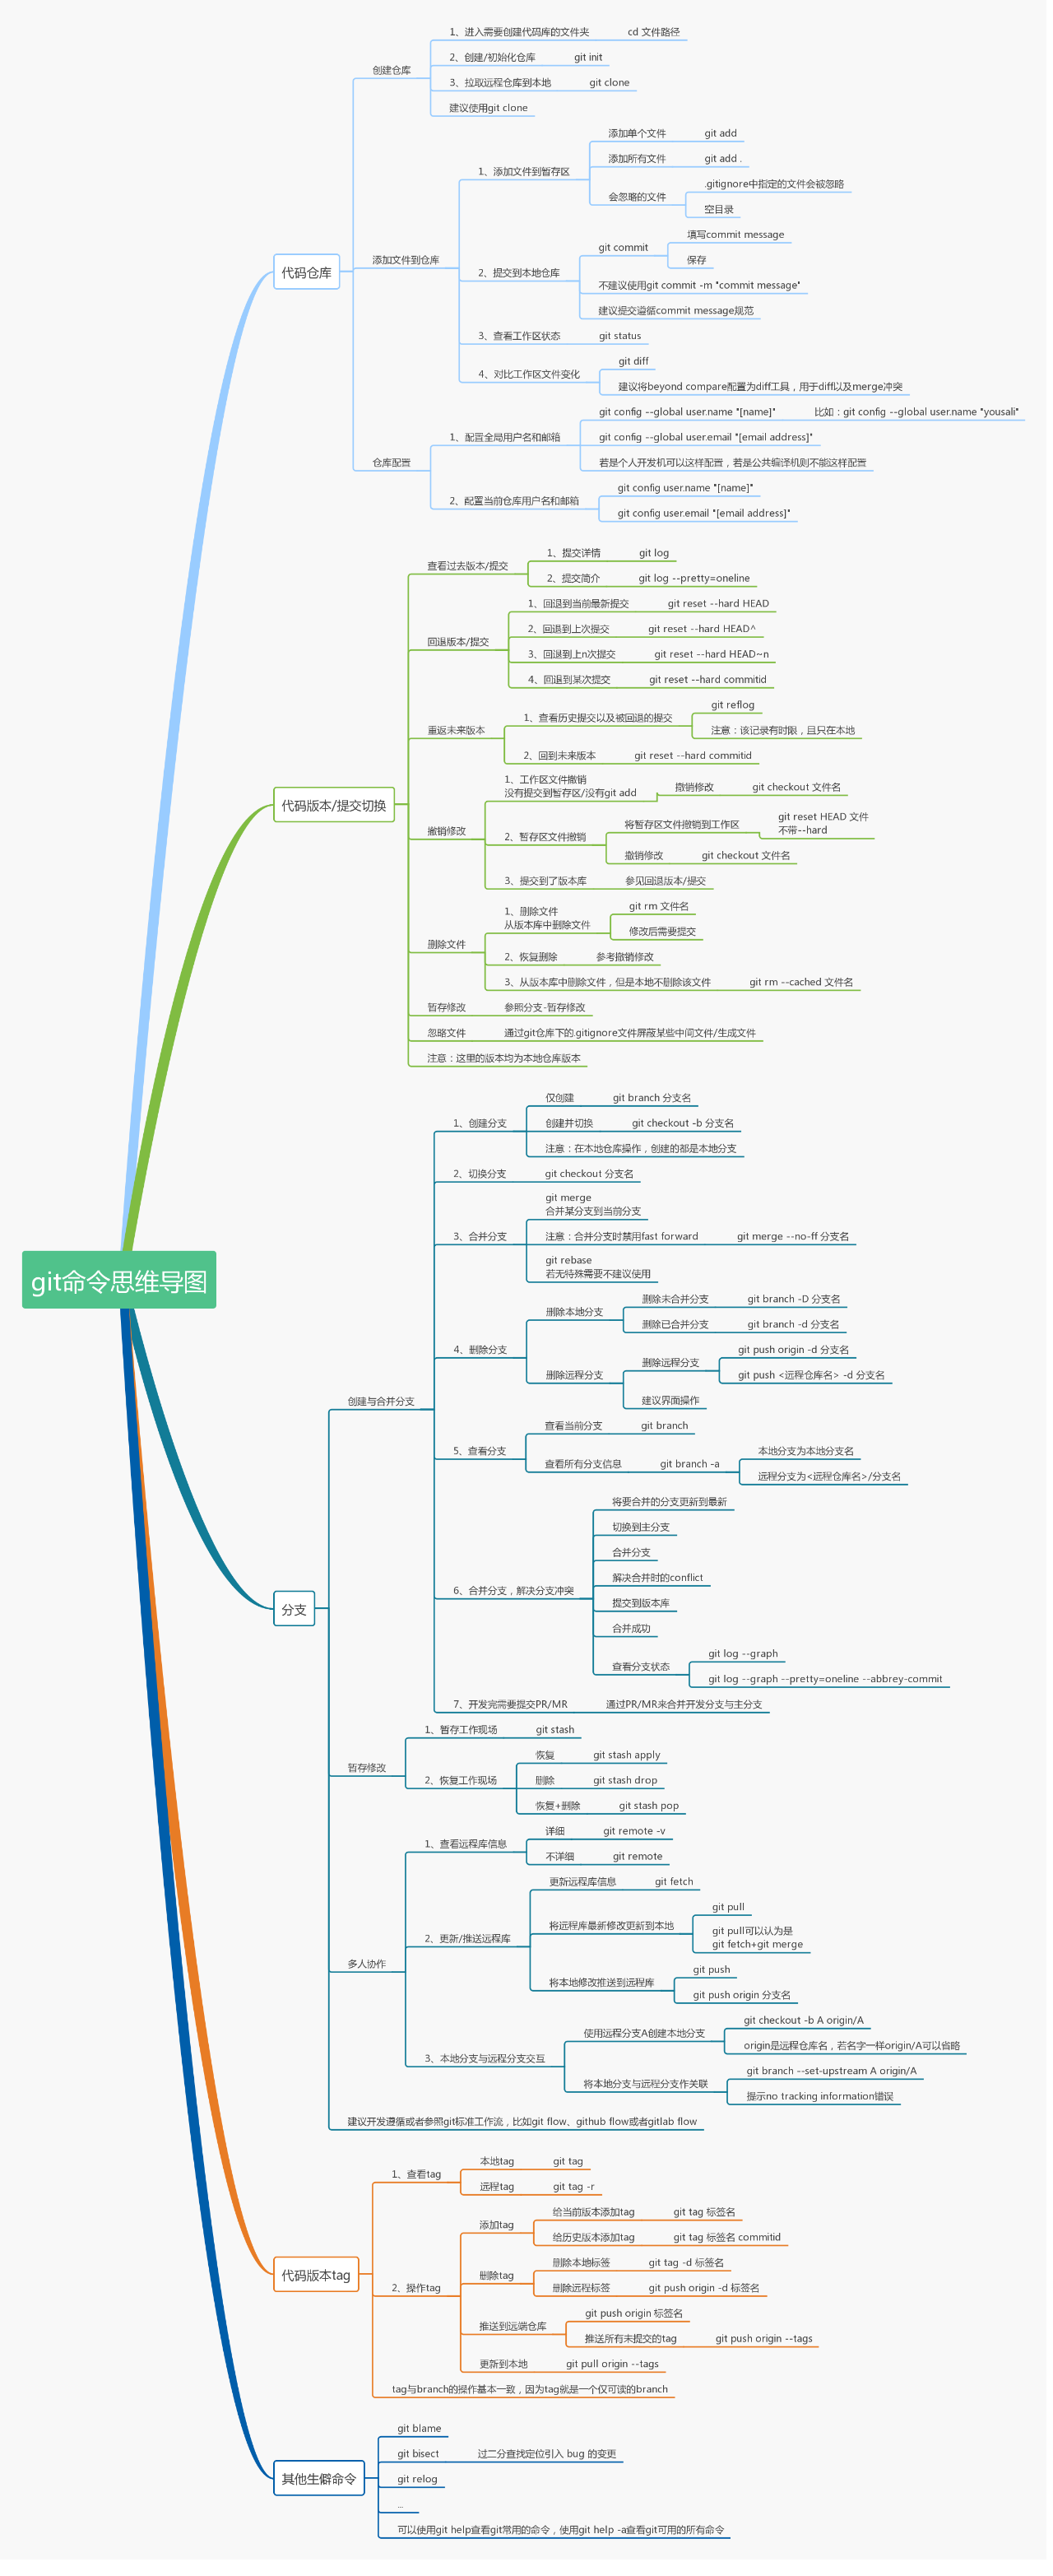
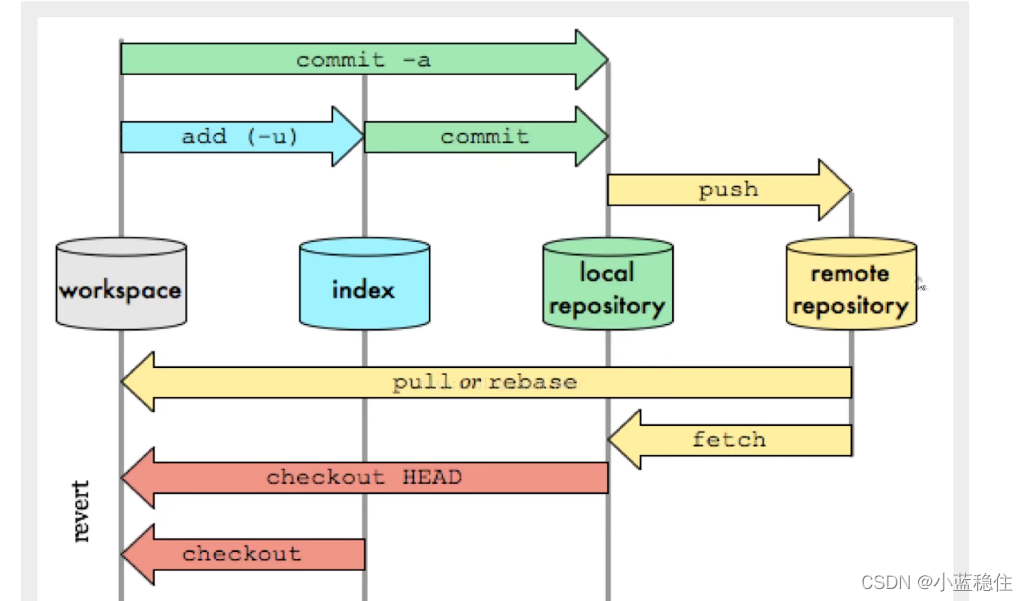
WechatIMG8


1. 工作流程

Git 的工作流程:

  1. 在工作中添加,修改文件

  2. 将需要进行的版本管理的文件放入暂存区域

  3. 将暂存区域文件提交到git仓库

    因此,git管理的文件有三种状态:已修改(modified),已暂存(staged),已提交(committed)

PM-7217454


2. 项目搭建

1. 本地仓库搭建

1
git init [path]

2. 远程仓库克隆

1
git clone [url]

3. 文件操作

1. git status

版本控制就是对文件的版本控制,要对文件进行修改,提交等操作,首先要知道文件当前什么状态,不然可能会提交了现在还不想提交的文件,或者要提交的文件没提交上。

  • Untracked:未跟踪,此文件在文件夹中,但并没有加入到git仓库,不参与版本控制。

    通过git add 状态变为Staged.

  • Unmodify:文件已经入库,未修改,即版本库中的文件快照内容与文件夹完全一致。

    • 如果它被修改,而变为Modified
    • 如果使用git rm 移出版本库,则成为Untracked文件.
  • Modified:文件已修改,仅仅是修改,并没有进行其他的操作。

    通过git add可进入暂存staged状态,

    使用git checkout,则丢弃修改,返回unmodify状态,这个git checkout即从库中取出文件,覆盖当前修改!

  • Staged:暂存状态,

    • 执行git commit则将修改同步到库中,这时库中的文件和本地文件又变为一致,文件为Unmodify状态。
    • 执行git reset HEAD filename取消暂存,文件状态为Modified

?:文件被修改,未添加到暂存区

A:已添加到暂存区

AM:已添加至暂存区,又产生了修改


2. git add & commit

add:

git add 命令可将该文件添加到暂存区。

添加一个或多个文件到暂存区:

1
git add [file1] [file2] ...

添加指定目录到暂存区,包括子目录:

1
git add [dir]

添加当前目录下的所有文件到暂存区:

1
2
3
git add .  //保存新的添加和修改,但是不包括删除
git add -A //保存所有的修改
git add -u //保存修改和删除,但是不包括新建文件。

commit:

提交暂存区到本地仓库中:

1
git commit -m ”commit message“

提交暂存区的指定文件到仓库区:

1
$ git commit [file1] [file2] ... -m ”commit message“

-a 参数设置修改文件后不需要执行 git add 命令,直接来提交

1
$ git commit -a

4. git diff

git diff 命令比较文件的不同,即比较文件在暂存区和工作区的差异。

git diff 命令显示已写入暂存区和已经被修改但尚未写入暂存区文件的区别。

git diff 有两个主要的应用场景。

  • 尚未缓存的改动:git diff
  • 查看已缓存的改动: git diff –cached
  • 查看已缓存的与未缓存的所有改动:git diff HEAD
  • 显示摘要而非整个 diff:git diff –stat

显示暂存区和工作区的差异:

1
$ git diff [file]

显示暂存区和上一次提交(commit)的差异:

1
2
3
$ git diff --cached [file]

$ git diff --staged [file]

显示两次提交之间的差异:

1
2
$ git diff [second-branch] //显示最近一次提交与制定提交之间的差异
$ git diff [first-branch]...[second-branch]

4. .gitignore

有些时候我们不想把某些文件纳入版本控制中,比如数据库文件,临时文件,设计文件等

在主目录下建立“.gitignore”文件,此文件有如下规则:

1.忽略文件中的空行或以井号(# )开始的行将会被忽略。
2.可以使用Linux通配符。例如∶星号(*)代表任意多个字符,问号(﹖)代表一个字符,方括号([abc] )代表可选字符范围,大括号( {string1,string2……})代表可选的字符串等。
3.如果名称的最前面有一个感叹号( !),表示例外规则,将不被忽略。
4.如果名称的最前面是一个路径分隔符(/ ),表示要忽略的文件在此目录下,而子目录中的文件不忽略。
5.如果名称的最后面是一个路径分隔符(/ ),表示要忽略的是此目录下该名称的子目录,而非文件(默认文件或目录都忽略)。

例如以下这些实例:

1
2
3
4
5
*.txt   #忽略所有的.txt结尾的文件
!lib.txt #但lib.txt除外
/temp #忽略项目根目录下的TODO文件,不包括其他目录temp
bulid/ #忽略bulid目录下的所有文件
doc/*.txt #会忽略doc/notes.txt 但是不包括doc/sever/arch.txt

.gitignore生效方法

.gitignore 中已经标明忽略的文件目录下的文件,git push的时候还会出现在push的目录中,或者用git status查看状态,想要忽略的文件还是显示被追踪状态。
原因是因为在git忽略目录中,新建的文件在git中会有缓存,如果某些文件已经被纳入了版本管理中,就算是在.gitignore中已经声明了忽略路径也是不起作用的,
这时候我们就应该先把本地缓存删除,然后再进行git的提交,这样就不会出现忽略的文件了。

解决方法: git清除本地缓存(改变成未track状态),然后再提交:

1
2
3
4
5
git rm -r --cached .
git add .
git commit -m 'update .gitignore'
git push -u origin main
1234

需要特别注意的是:
1).gitignore只能忽略那些原来没有被track的文件,如果某些文件已经被纳入了版本管理中,则修改.gitignore是无效的。
2)想要.gitignore起作用,必须要在这些文件不在暂存区中才可以,.gitignore文件只是忽略没有被staged(cached)文件,
对于已经被staged文件,加入ignore文件时一定要先从staged移除,才可以忽略。


5. git reset

git reset 命令用于回退版本,可以指定退回某一次提交的版本。

git reset 命令语法格式如下:

1
git reset [--soft | --mixed | --hard] [HEAD]
参数 功能 场景
–hard 清空工作区与暂存区 放弃目标版本后所有的修改
–soft 保留工作区与暂存区,但是把版本之间的差异存放在暂存区 合并多个commit
–mixed(或缺省) 保留工作区清空暂存区,把版本之间的差异存放在工作区 1、有错误的commit需要修改;2、git reset HEAD清空暂存区

1. –mixed

回退 add

重置暂存区的文件,使其与上一次的提交(commit)保持一致,工作区文件内容保持不变。为默认,可以不用带该参数,

1
git reset  [HEAD] 

实例:

1
2
3
$ git reset HEAD^            # 回退所有内容到上一个版本  
$ git reset HEAD^ hello.php # 回退 hello.php 文件的版本到上一个版本
$ git reset 052e # 回退到指定版本

2. –soft

回退 commit

参数用于回退到某个版本,暂存区保存所有的 commit 回退,工作区内容不变:

1
git reset --soft HEAD^

实例:

1
$ git reset --soft HEAD~3   # 回退上上上一个版本 

3. –hard

将暂存区与工作区都回到上一次版本,并删除之前的所有信息提交,撤销工作区中所有未提交的修改内容:

1
git reset --hard HEAD^

实例:

1
2
3
$ git reset --hard HEAD~3  # 回退上上上一个版本  
$ git reset –hard bae128 # 回退到某个版本回退点之前的所有信息。
$ git reset --hard origin/main # 将本地的状态回退到和远程的一样

注意:谨慎使用 –-hard 参数,它会删除回退点之前的所有信息。

HEAD 说明:

  • HEAD 表示当前版本

  • HEAD^ 上一个版本

  • HEAD^^ 上上一个版本

  • HEAD^^^ 上上上一个版本

  • 以此类推…

可以使用 ~数字表示

  • HEAD~0 表示当前版本
  • HEAD~1 上一个版本
  • HEAD^2 上上一个版本
  • HEAD^3 上上上一个版本
  • 以此类推…

6. git rm

git rm 命令用于删除文件。

如果只是简单地从工作目录中手工删除文件,运行 git status 时就会在 Changes not staged for commit 的提示。

git rm 删除文件有以下几种形式:

1、将文件从暂存区和工作区中删除:

1
git rm <file>

以下实例从暂存区和工作区中删除 runoob.txt 文件:

1
git rm runoob.txt 

如果删除之前修改过并且已经放到暂存区域的话,则必须要用强制删除选项 -f

强行从暂存区和工作区中删除修改后的 runoob.txt 文件:

1
git rm -f runoob.txt 

如果想把文件从暂存区域移除,但仍然希望保留在当前工作目录中,换句话说,仅是从跟踪清单中删除,使用 –cached 选项即可:

1
git rm --cached <file>

以下实例从暂存区中删除 runoob.txt 文件:

1
git rm --cached runoob.txt

7. git mv

git mv 命令用于移动或重命名一个文件、目录或软连接。

1
git mv [file] [newfile]

如果新文件名已经存在,但还是要重命名它,可以使用 -f 参数:

1
git mv -f [file] [newfile]

我们可以添加一个 README 文件(如果没有的话):

1
git add README 

然后对其重命名:

1
2
3
git mv README  README.md
ls
README.md

8. git log

1. git log

1
2
3
4
5
git log //查看已生效保存的操作日志
git log --oneline //查看历史记录的简洁的版本
git log --graph //开启了拓扑图选项
git log --reverse --oneline //逆向显示所有日志
git log --author //查找指定用户的日志
1
2
//查看 Git 项目中三周前且在四月十八日之后的所有提交,--no-merges 选项隐藏合并提交:
$ git log --oneline --before={3.weeks.ago} --after={2010-04-18} --no-merges

2. git reflog

查看所有操作日志

3. git blame

如果要查看指定文件的修改记录可以使用 git blame 命令,格式如下:

1
git blame <file>

git blame 命令是以列表形式显示修改记录,如下实例:

1
2
3
$ git blame README 
^d2097aa (tianqixin 2020-08-25 14:59:25 +0800 1) # Runoob Git 测试
db9315b0 (runoob 2020-08-25 16:00:23 +0800 2) # 菜鸟教程

SHA256:ZDWmhQ+Yt1RZ2KBaT87wBvBljWs14oBtJPSB02fHfSQ snowed16@gmail.com


4. 使用分支

1. git branch

1
2
3
4
5
git branch
git branch -r //查看远程分支
git branch -a //查看本地和远程分支

git branch -m dev2 version.2 //修改分支dev2的名字为version.2

2. 创建分支

1
git branch (branchname)

3. git checkout

更新工作树中的文件以匹配索引或指定树中的版本。如果没有给出路径 - git checkout还会更新HEAD,将指定的分支设置为当前分支。

1
2
3
4
5
6
7
git checkout (branchname)

git checkout <branch_name> <file_name> //将指定分支的指定提交内容还原到当前分支工作区

git checkout .
#这条命令把 当前目录所有修改的文件 从HEAD中签出并且把它恢复成未修改时的样子.
#注意:在使用 git checkout 时,如果其对应的文件被修改过,那么该修改会被覆盖掉。

4. 删除分支

删除分支命令:

1
2
3
git branch -d branchname  //在删除前检查merge状态
git branch -D branchname //force,直接删除
git push origin --delete branchname //删除远程分支

5. git merge

将分支mymac合并到当前分支:

1
2
3
git merge mymac

git merge --no-commit mymac //将分支mymac合并到当前分支中,但不要自动进行新的提交

6. 合并冲突

合并分支:

1
git merge mymac

合并产生冲突,查看冲突内容:

1
git diff

重新合并:

1
git commit


5. 使用标签

1. 创建标签

用于新建一个标签,默认为HEAD,也可以指定一个commit id;

1
git tag <tagname> (<commit id>)

指定标签信息,-a 选项意为”创建一个带注解的标签”

1
2
3
git tag -a <tagname> -m "taginfo" 

git tag -s <tagname> -m "taginfo" //PGP签名标签

可以查看所有标签。

1
git tag

2. 操作标签

1
2
3
4
5
6
7
8
9
10
git tag -d v0.1           //删除标签

git push origin <tagname> //投送指定标签到远程

git push origin --tags //投送所有标签到远程


//删除远程标签
git tag -d v0.9 //首先要删除本地标签
git push origin :refs/tags/v0.9 //再删除远程


6. 使用github

1. 设置秘钥

1
2
3
4
5
6
7
8
9
10
11
12
13
14
15
16
//设置好 git name & email

cd ~/.ssh //查看ssh目录

ssh-keygen -t rsa -C "[email protected]" //生成密钥

//设置秘钥名字 放在~/.ssh文件夹
Enter file in which to save the key (/Users/.ssh/id_rsa): /Users/.ssh/id_rsa

//设置私钥密码
Enter passphrase (empty for no passphrase):

//将公钥id_rsa.pub 复制到 github

//克隆 git 版本到本地目录
git clone${SSH url}

参考:

Mac下git通过SSH进行免密码安全连接github_弦苦的博客-CSDN博客_mac ssh连接github

Connecting to GitHub with SSH - GitHub Docs

What is ssh-keygen & How to Use It to Generate a New SSH Key?

2. git clone

下载开源git库Reachability

(1)Add SSH Key to GitHub后,登录github,在github开源项目网页中有三种Clone URL:

clone私有库:

1
git clone http://tokens-name: *tokens* @github.com/YOUR-USERNAME/YOUR-REPOSITORY

3. ssh登录

1.ssh登录

(1)登录机制

Git主机间的通信采用的是SSH协议,即Sercure Shell协议。

该协议的免密登录机制,要求主机之间采用SSH-key,即SSH密钥的方式进行身份验证。

SSH密钥包含“公钥与私钥”,所以我们首先要了解什么是“公钥与私钥”,然后还要理解“公钥与私钥”在免密登录中的作用,即免密登录的工作原理。

(2)公钥与私钥

公钥(Public Key)与私钥(Private Key)是通过加密算法得到的一个密钥对(即一个公钥和一个私钥,也就是非对称加密方式)。公钥可对会话进行加密、验证数字签名,只有使用对应的私钥才能解密会话数据,从而保证数据传输的安全性。公钥是密钥对外公开的部分,私钥则是非公开的部分,由用户自行保管。

通过加密算法得到的密钥对可以保证在世界范围内是唯一的。使用密钥对的时候,如果用其中一个密钥加密一段数据,只能使用密钥对中的另一个密钥才能解密数据。例如:用公钥加密的数据必须用对应的私钥才能解密;如果用私钥进行加密也必须使用对应的公钥才能解密,否则将无法成功解密。
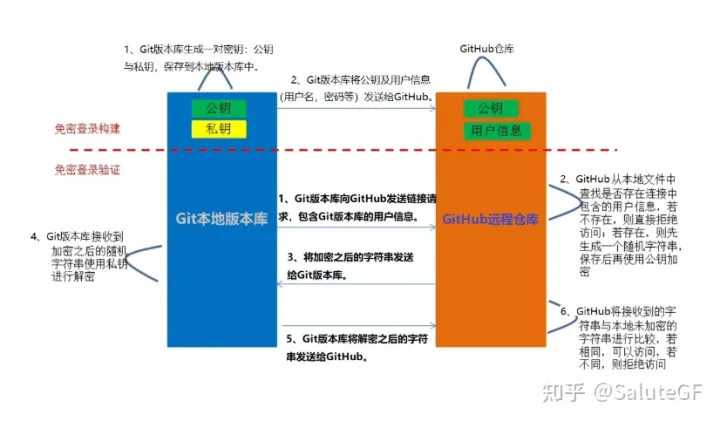
(3)登录的工作原理

对于免密登录的机制,主要由两部分构成:构建与验证。

  • 登录构建: Git版本库所在的主机上生成一对密钥:公钥与私钥,保存到本地主机中。 Git版本库将公钥及用户信息(用户名,密码等)保存到GitHub上。
  • 登录验证: 1、Git版本库向GitHub发送连接请求,包含Git版本库的用户信息。 2、GitHub从本地文件中查找是否存连接中包含的用户信息。若不存在:则拒绝访问,若存在:可以访问。 3、GitHub将加密后的随机字符串,发送给Git版本库。 4、Git版本库将加密后的随机字符串,使用私钥进行解密。 5、Git版本库解密后的字符发送给GitHub。 6、GitHub将接收到的字符串,与本地未加密的字符串进行比较,相同则可以访问,不同则被拒绝。

免密登录原理示意图:

img

简单的理解:

SSH Key也可以简单的理解为你的身份标识,放在GitHub上面标明你是这个项目的一个开发人员,但是别人可以截获,但是你本机上的私钥无法截获,也就保证了每次传输是安全的。

2. 具体配置

1. 配置全局的用户名和邮箱(不是必须)

1
2
git config --global user.name "xxx"
git config --global user.email "xxx.com"

2. 打开命令行终端,验证是否有ssh keys,看下返回的结果中是否已经存在了.pub结尾的文件

1
ls -alh ~/.ssh

如果有.pub结尾的文件直接打开,复制到github上的SSH keys,如果没有就继续执行

img

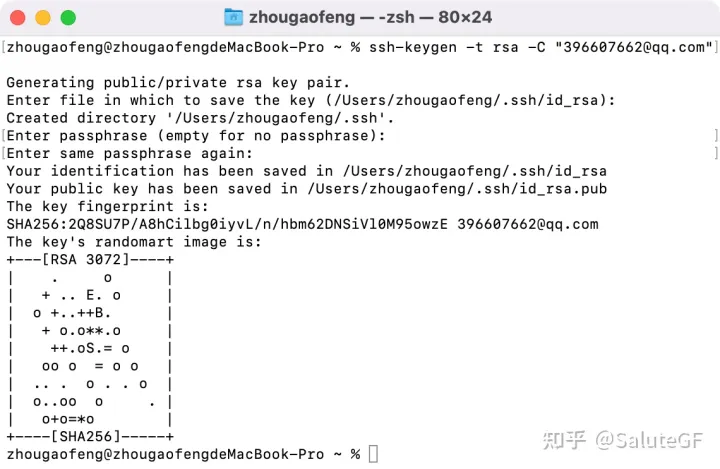
2. 使用如下命令生成ssh-keygen密钥,然后一路回车。其中,“邮箱地址”是你的github关联的邮箱。

1
ssh-keygen -t rsa -C "邮箱地址"

img

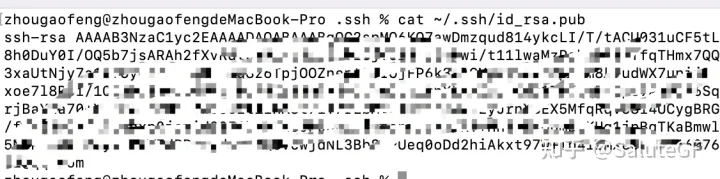
这个时候在默认路径下就生成了两个文件,公钥和私钥。进入主目录下的.ssh文件夹,公钥为id_rsa.pub,私钥为id_rsa。

img

执行以下命令查看公钥内容,打开id_rsa.pub文件,复制此内容

1
cat ~/.ssh/id_rsa.pub

img

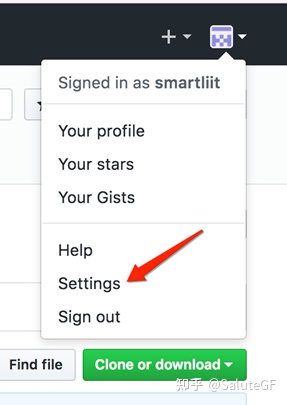
3. 点击账户头像后的下拉三角,选择’settings’。

img

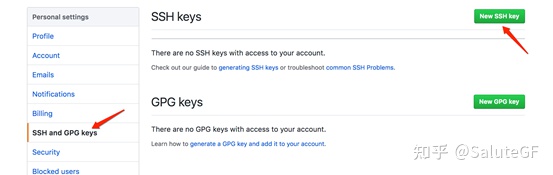
4. 点击’SSH and GPG keys’,添加ssh公钥。

img

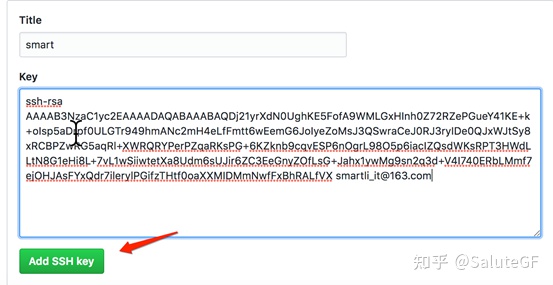
5. 填写标题,粘贴公钥,点击Add SSH key,输入GitHub密码即可

img

6. 验证GitHub是否链接

1
ssh -T [email protected]

3. 修改密码

1
2
3
ssh-keygen-p     //修改密码

ssh-keygen -t rsa -C "[email protected]" //重新生成秘钥

4. git remote

方法1:
删除本地仓库当前关联的无效远程地址,再为本地仓库添加新的远程仓库地址

1
2
3
4
git remote -v                       // 查看git对应的远程仓库地址
git remote rm origin // 删除关联对应的远程仓库地址
git remote -v // 查看是否删除成功,如果没有任何返回结果,表示OK
git remote add origin "新的仓库地址" // 重新关联git远程仓库地址

方法2:
直接修改本地仓库所关联的远程仓库的地址

1
2
3
git remote  					 		   // 查看远程仓库名称:origin 
git remote get-url origin // 查看远程仓库地址
git remote set-url origin "新的仓库地址" // ( 如果未设置ssh-key,此处仓库地址为 http://... 开头)

方法3:
修改 .git/config 配置文件

1
2
cd .git      // 进入.git目录
vim config // 修改config配置文件,快速找到remote "origin"下面的url并替换即可实现快

要查看当前配置有哪些远程仓库,可以用命令:

1
2
3
4
5
6
7
8
9
10
11
12
13
git remote [-v | --verbose]
git remote add [-t <branch>] [-m <main>] [-f] [--[no-]tags] [--mirror=<fetch|push>] <name> <url>
git remote rename <old> <new>
git remote remove <name>
git remote set-head <name> (-a | --auto | -d | --delete | <branch>)
git remote set-branches [--add] <name> <branch>…​
git remote get-url [--push] [--all] <name>
git remote set-url [--push] <name> <newurl> [<oldurl>]
git remote set-url --add [--push] <name> <newurl>
git remote set-url --delete [--push] <name> <url>
git remote [-v | --verbose] show [-n] <name>…​
git remote prune [-n | --dry-run] <name>…​
git remote [-v | --verbose] update [-p | --prune] [(<group> | <remote>)…​]

示例

以下是一些示例 -

1.查看当前的远程库

要查看当前配置有哪些远程仓库,可以用 git remote 命令,它会列出每个远程库的简短名字.在克隆完某个项目后,至少可以看到一个名为 origin 的远程库, git 默认使用这个名字来标识你所克隆的原始仓库:

1
2
3
$ git clone http://git.oschina.net/yiibai/sample.git
$ cd sample

(1)git remote 不带参数,列出已经存在的远程分支

1
2
3
$ git remote
origin

2)git remote -v | --verbose 列出详细信息,在每一个名字后面列出其远程url
此时, -v 选项(译注:此为 –verbose 的简写,取首字母),显示对应的克隆地址:

1
2
3
4
5
6
7
8
9
$ git remote -v
origin http://git.oschina.net/yiibai/sample.git (fetch)
origin http://git.oschina.net/yiibai/sample.git (push)

Administrator@MY-PC /D/worksp/sample (main)
$ git remote --verbose
origin http://git.oschina.net/yiibai/sample.git (fetch)
origin http://git.oschina.net/yiibai/sample.git (push)

2. 添加一个新的远程,抓取,并从它检出一个分支 -

1
2
3
4
5
6
7
8
9
10
11
12
13
14
15
16
17
18
19
20
21
22
23
24
$ git remote
origin
$ git branch -r
origin/HEAD -> origin/main
origin/main
$ git remote add staging git://git.kernel.org/.../gregkh/staging.git
$ git remote
origin
staging
$ git fetch staging
...
From git://git.kernel.org/pub/scm/linux/kernel/git/gregkh/staging
* [new branch] main -> staging/main
* [new branch] staging-linus -> staging/staging-linus
* [new branch] staging-next -> staging/staging-next
$ git branch -r
origin/HEAD -> origin/main
origin/main
staging/main
staging/staging-linus
staging/staging-next
$ git checkout -b staging staging/main
...

3.添加远程仓库

要添加一个新的远程仓库,可以指定一个简单的名字,以便将来引用,运行 git remote add [shortname] [url]:

1
2
3
4
5
6
7
8
9
10
11
12
13
14
15
$ git remote
  origin
$ git remote add pb http://git.oschina.net/yiibai/sample.git
$ git remote -v origin http://git.oschina.net/yiibai/sample.git
  pb http://git.oschina.net/yiibai/sample2.git 现在可以用字串 pb 指代对应的仓库地址了.比如说,要抓取所有 Paul 有的,但本地仓库没有的信息,可以运行 git fetch pb:

$ git fetch pb
  remote: Counting objects: 58, done.
  remote: Compressing objects: 100% (41/41), done.
  remote: Total 44 (delta 24), reused 1 (delta 0)
  Unpacking objects: 100% (44/44), done.
  From http://git.oschina.net/yiibai/sample2.git
  * [new branch] main -> pb/main
  * [new branch] ticgit -> pb/ticgit

4.模仿 git clone,但只跟踪选定的分支

1
2
3
4
5
$ mkdir project.git
$ cd project.git
$ git init
$ git remote add -f -t main -m main origin git://example.com/git.git/
$ git merge origin

5. git fetch

1
2
3
4
git fetch  下一条的简写
git fetch origin 从远程仓库所有分支的更新

git fetch <远程主机名> <分支名> //取回特定分支的更新

该命令执行完后需要执行 git merge 远程分支到你所在的分支。

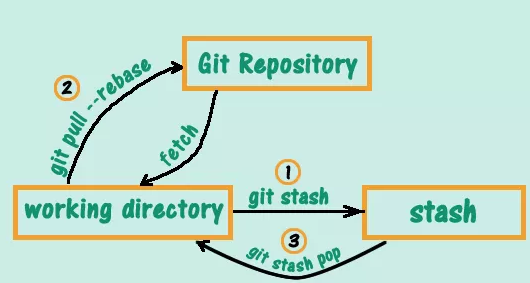
6. git pull

取回远程主机某个分支的更新,再与本地的指定分支合并

1
2
3
4
git pull <远程主机名> <远程分支名>:<本地分支名>

//示例:要取回origin主机的next分支,与本地分支合并
git pull origin next

git pull –rebase 理解

这里写图片描述

这个命令做了以下内容:
a.把你 commit 到本地仓库的内容,取出来放到暂存区(stash)(这时你的工作区是干净的)
b.然后从远端拉取代码到本地,由于工作区是干净的,所以不会有冲突
c.从暂存区把你之前提交的内容取出来,跟拉下来的代码合并

示例:

以下是一些示例 -

1
$ git pull <远程主机名> <远程分支名>:<本地分支名>

比如,要取回origin主机的next分支,与本地的main分支合并,需要写成下面这样 -

1
$ git pull origin next:main

如果远程分支(next)要与当前分支合并,则冒号后面的部分可以省略。上面命令可以简写为:

1
$ git pull origin next

上面命令表示,取回origin/next分支,再与当前分支合并。实质上,这等同于先做git fetch,再执行git merge

1
2
$ git fetch origin
$ git merge origin/next

在某些场合,Git会自动在本地分支与远程分支之间,建立一种追踪关系(tracking)。比如,在git clone的时候,所有本地分支默认与远程主机的同名分支,建立追踪关系,也就是说,本地的main分支自动”追踪”origin/main分支。

Git也允许手动建立追踪关系。

1
2
$ git branch --set-upstream-to main origin/next
$ git branch --track main origin/next

上面命令指定main分支追踪origin/next分支。

如果当前分支与远程分支存在追踪关系,git pull就可以省略远程分支名。

1
$ git pull origin

上面命令表示,本地的当前分支自动与对应的origin主机”追踪分支”(remote-tracking branch)进行合并。

如果当前分支只有一个追踪分支,连远程主机名都可以省略。

1
$ git pull

上面命令表示,当前分支自动与唯一一个追踪分支进行合并。

如果合并需要采用rebase模式,可以使用–rebase选项。

1
$ git pull --rebase <远程主机名> <远程分支名>:<本地分支名>

git fetch和git pull的区别

  1. git fetch:相当于是从远程获取最新版本到本地,不会自动合并。
1
2
3
$ git fetch origin main
$ git log -p main..origin/main
$ git merge origin/main

以上命令的含义:

  • 首先从远程的originmain主分支下载最新的版本到origin/main分支上
  • 然后比较本地的main分支和origin/main分支的差别
  • 最后进行合并

上述过程其实可以用以下更清晰的方式来进行:

1
2
3
$ git fetch origin main:tmp
$ git diff tmp
$ git merge tmp
  1. git pull:相当于是从远程获取最新版本并merge到本地
1
git pull origin main

上述命令其实相当于git fetchgit merge
在实际使用中,git fetch更安全一些,因为在merge前,我们可以查看更新情况,然后再决定是否合并。

7. git push

推送你的新分支与数据到某个远端仓库命令:

1
2
3
4
5
6
7
git push origin 

git push origin main //将本地的main分支推送到origin主机的main分支

git push --force origin //强制推送远程,及时远程版本新

gitk rbranch-1 //查看push的结果

8. 删除远程仓库

删除远程仓库你可以使用命令:

1
git remote rm [别名]

9. 推送本地仓库

…or create a new repository on the command line

1
2
3
4
5
6
7
8
echo "# Backup-Markdown" >> README.md
git init
git add README.md
git commit -m "first commit"
git branch -M main
git remote add origin [email protected]:snowed16/...git
# [email protected]:snowed16/...git 为对应仓库ssh地址
git push -u origin main

…or push an existing repository from the command line

1
2
3
git remote add origin [email protected]:snowed16/...git
git branch -M main
git push -u origin main

…or import code from another repository

You can initialize this repository with code from a Subversion, Mercurial, or TFS project.


7. Git 服务器搭建

上一章节中我们远程仓库使用了 Github,Github 公开的项目是免费的,2019 年开始 Github 私有存储库也可以无限制使用。

这当然我们也可以自己搭建一台 Git 服务器作为私有仓库使用。

接下来我们将以 Centos 为例搭建 Git 服务器。

1、安装Git

1
2
$ yum install curl-devel expat-devel gettext-devel openssl-devel zlib-devel perl-devel
$ yum install git

接下来我们 创建一个git用户组和用户,用来运行git服务:

1
2
$ groupadd git
$ useradd git -g git

2、创建证书登录

收集所有需要登录的用户的公钥,公钥位于id_rsa.pub文件中,把我们的公钥导入到/home/git/.ssh/authorized_keys文件里,一行一个。

如果没有该文件创建它:

1
2
3
4
5
$ cd /home/git/
$ mkdir .ssh
$ chmod 755 .ssh
$ touch .ssh/authorized_keys
$ chmod 644 .ssh/authorized_keys

3、初始化Git仓库

首先我们选定一个目录作为Git仓库,假定是/home/gitrepo/runoob.git,在/home/gitrepo目录下输入命令:

1
2
3
4
5
6
7
$ cd /home
$ mkdir gitrepo
$ chown git:git gitrepo/
$ cd gitrepo

$ git init --bare runoob.git
Initialized empty Git repository in /home/gitrepo/runoob.git/

以上命令Git创建一个空仓库,服务器上的Git仓库通常都以.git结尾。然后,把仓库所属用户改为git:

1
$ chown -R git:git runoob.git

4、克隆仓库

1
2
3
4
$ git clone git@192.168.45.4:/home/gitrepo/runoob.git
Cloning into 'runoob'...
warning: You appear to have cloned an empty repository.
Checking connectivity... done.

192.168.45.4 为 Git 所在服务器 ip ,你需要将其修改为你自己的 Git 服务 ip。

这样我们的 Git 服务器安装就完成。

8. Git换行符

GNU/Linux和Mac OS使用换行(LF)或新行作为行结束字符,而Windows使用换行和回车(LFCR)组合来表示行结束字符。

为了避免这些行结尾的差异的不必要提交,我们必须配置Git客户端写入与Git仓库使用相同的行结束符。

对于Windows系统,可以将Git客户端配置为将行结束符转换为CRLF格式,同时退出,并在提交操作时将其转换回LF格式。以下可根据您的需要来设置。

1
git config --global core.autocrlf true

对于GNU/LinuxMac OS,我们可以配置Git客户端,以便在执行结帐操作时将行结束符从CRLF转换为LF。

1
git config --global core.autocrlf input

9. Reference

  1. Git - Reference (git-scm.com)

  2. Git 教程 | 菜鸟教程 (runoob.com)
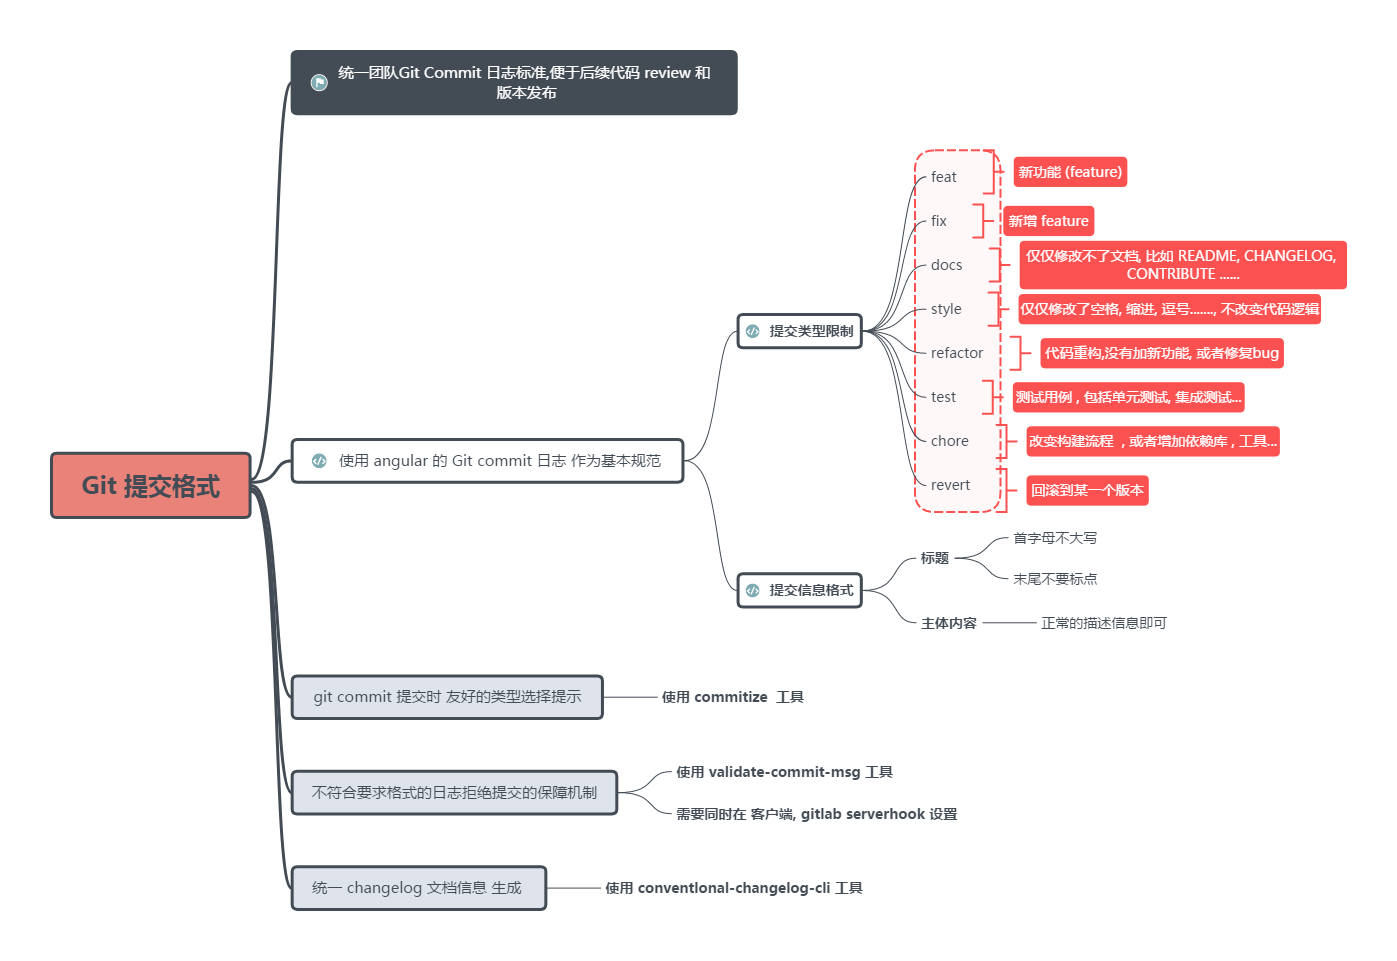
Git Commit 标准化

1. 规范介绍

​ 介绍 AngularJS 的规范,它是由 Google 推出的一套提交消息规范标准,也是目前使
用范围最广的规范。有一套合理的手册也较为系统化;并且还有配套的工具可以供我们使用。

规范执行方案如下:  

img

2. Google AnguarJS 规范

1. 规范目标

- 允许通过脚本生成 CHANGELOG.md
- 可以通过范围的关键词,快速的搜索到指定版本

1
git log HEAD --grep feat(package.json) # 在package.json文件里新增的特性。 

2. 格式要求

1
2
3
4
5
<type>(<scope>): <subject>
<BLANK LINE>
<body>
<BLANK LINE>
<footer>
  • 消息只占用一行,任何行都不能超过 100 个字符
  • 允许使用 GitHub 以及各种 Git 工具阅读消息
  • 提交消息由页眉、正文和页脚组成,由空行分隔

3.<type>

代表某次提交的类型,比如是修复一个 bug 或是增加一个 feature,类型如下:

img

4.<scope>

范围可以是指定提交更改位置的任何内容,如:

  • 对 package.json 文件新增依赖库,chore(package.json): 新增依赖库
  • 或对代码进行重构,refacto(weChat.vue): 重构微信进件

5.<subject>

如果没有更合适的范围,可以直接写提交内容

3. Commit 实战

提交一条依赖库变更,type 为 chore(增加依赖库);等提交完成后,使用 Git 工具进行搜索。
此时搜索类型是 chore(package.json),所以就能知道 package.json 文件所有的历史变更。

1
2
3
4
5
# 新增一条 Commit 记录
git commit -m 'chore(package.json): 新增 AngularJS 规范,Commit 时会自动调用钩子(GitHook)来判断 Message 是否有效'

# 搜索跟 package.json 文件相关的历史记录
git log HEAD --grep chore(package.json)

4. 工具介绍

​ 为了更加方便地遵守 Git Commit 规范,我们可以使用 commitizen 插件。commitizen 是一个专门用于规范化 Git Commit 记录的工具,它可以在提交代码时帮助我们生成符合规范的 Git Commit 记录。

1. 全局安装

1
npm install -g commitizen

初始化:选择cz-conventional-changelog这个预设初始化,它与我们前面介绍的 Git Commit 规范一致。

Install your preferred commitizen adapter globally (for example cz-conventional-changelog).

1
npm install -g cz-conventional-changelog

项目 git 目录初始化 commitizen:

1
commitizen init cz-conventional-changelog --save-dev --save-exact

使用:用 git cz 来代替 git commit 命令来提交代码。

1
git cz

2. 项目安装

安装:项目根目录下,安装命令。

1
npm install commitizen -D

初始化:利用 npx 执行 commitizen 命令中使用 cz-conventional-changelog 预设,在项目中初始化;

1
npx commitizen init cz-conventional-changelog --save-dev --save-exact

使用:用 npx cz 来代替 git commit 命令来提交代码。

1
npx cz

扩展:可在 package.json 的 scripts 中添加命令来 npm run 执行;

1
2
3
4
5
6
{
"scripts": {
"...": "...",
"commit": "git add . && cz"
}
}提交代码;
1
2
3
4
5
npm run commit

#等价于
#git add .
#npx cz

3. 使用指南

执行 cz 命令提交代码时,commitizen 会在终端中发起如下会话,根据提示选择合适的type,填写scope、subject等;

1
2
3
4
5
6
7
8
9
10
11
12
13
14
15
16
17
18
# 选择type,本次 commit 的类型;
Select the type of change that you're committing:

# 输入 scope 影响范围(回车可跳过);
What is the scope of this change (e.g. component or file name): (press enter to
skip)

# 输入 subject 主题,简短描述 commit 内容;
Write a short, imperative tense description of the change (max 94 chars):

# 输入 body 描述,详细描述 commit 内容(回车可跳过);
Provide a longer description of the change: (press enter to skip)

# 本次 commit 是否是一次重大的更改(y/N);
Are there any breaking changes? (y/N)

# 本次 commit 是否影响哪个issues(y/N);
Does this change affect any open issues? (y/N)

5. 应用模板

变更消息模板可以通过文件的方式固话下来,这样在每次提交变更的时候参照模板填写对应的信息。 一个完整的模板内容如下:

1
2
3
4
5
6
7
8
9
10
11
12
13
14
15
16
17
18
19
20
21
22
23
24
25
26
27
28
29
30
31
32
33
34
# head: <type>(<scope>): <subject>
# - type: feat, fix, docs, style, refactor, perf, test, build, ci, chore, revert
# - scope: can be empty (eg. if the change is a global or difficult to assign to a single component), e.g: route, component, utils, build...
# - subject: start with verb (such as 'change'), 50-character line
#
# body: 72-character wrapped. Multiple lines separated by “-”, This should answer:
# * Why was this change necessary?
# * How does it address the problem?
# * Are there any side effects?
#
# footer:
# - Include a link to the ticket, if any.
# - BREAKING CHANGE
#
# e.g:
# <type>(<scope>): <subject>
# <BLANK LINE>
# <body>
# <BLANK LINE>
# <footer>
#
# types:
#
# feat: A new feature
# fix: A bug fix
# docs: Documentation only changes
# style: Changes that do not affect the meaning of the code (white-space, formatting, missing semi-colons, etc)
# refactor: A code change that neither fixes a bug nor adds a feature
# perf: A code change that improves performance
# test: Adding missing tests or correcting existing tests
# build: Changes that affect the build system or external dependencies (example scopes: gulp, broccoli, npm)
# ci: Changes to our CI configuration files and scripts (example scopes: Travis, Circle, BrowserStack, SauceLabs)
# chore: Other changes that don't modify src or test files
# revert: Reverts a previous commit

可以将上述模板信息保存在文件”~/.gitmessage “中并添加为git的commit模板: 修改 ~/.gitconfig,添加:

1
2
[commit]
template = ~/.gitmessage

6. 参考链接

  1. Git Commit 标准化 (cnblogs.com)

  2. Git Commit Message Conventions - Google Docs

  3. Git Commit 规范和 commitizen 插件的使用 (vincef0ng.cn)

  4. commitizen/cz-cli: The commitizen command line utility.(github.com)

  5. 约定式提交 (conventionalcommits.org)

  6. The conventional commits specification (github.com)

Git cheatsheets

1
2
3
4
5
6
7
8
9
10
11
12
13
14
15
16
17
18
19
20
21
22
23
24
25
26
27
28
29
30
31
32
33
34
35
36
37
38
39
40
41
42
43
44
45
46
47
48
49
50
51
52
53
54
55
56
57
58
59
60
61
62
63
64
65
66
67
68
69
70
71
72
73
74
75
76
77
78
79
80
81
82
83
84
85
86
87
88
89
90
91
92
93
94
95
96
97
98
99
100
101
102
103
104
105
106
107
108
109
110
111
112
113
114
115
116
117
118
119
120
121
122
123
124
125
126
127
128
129
130
131
132
133
134
135
136
137
138
139
140
141
142
143
144
145
146
147
148
149
150
151
152
153
154
155
156
157
158
159
160
161
162
163
164
165
166
167
168
169
170
171
172
173
174
175
176
177
178
179
180
181
182
183
184
185
186
187
188
189
190
191
192
193
194
195
196
197
198
199
200
201
202
203
204
205
206
207
208
209
210
211
212
213
214
215
216
217
218
219
220
221
222
223
224
225
226
227
228
229
230
231
232
233
234
235
236
237
238
239
240
241
242
243
244
245
246
247
248
249
250
251
252
253
254
255
256
257
258
259
260
261
262
263
264
265
266
267
268
269
270
271
272
273
274
275
276
277
278
279
280
281
282
283
284
285
286
287
288
289
290
291
292
293
294
295
296
297
298
299
300
301
302
303
304
305
306
307
308
309
310
311
312
313
314
315
316
317
318
319
320
321
322
323
324
325
326
327
328
329
330
331
332
333
334
335
336
337
338
339
340
341
342
343
344
345
346
347
348
349
350
351
352
353
354
355
356
357
358
359
360
361
362
363
364
365
366
367
368
369
370
371
372
373
374
375
376
377
378
379
380
381
382
383
384
385
386
387
388
389
390
391
392
393
394
395
396
397
398
399
400
401
402
403
404
405
406
407
408
409
410
411
412
413
414
415
416
417
418
419
420
421
422
423
424
425
426
427
428
429
430
431
432
433
434
435
436
437
438
439
440
441
442
443
444
445
446
447
448
449
450
451
452
453
454
455
456
457
458
459
460
461
##############################################################################
# GIT CHEATSHEET (中文速查表) - by albertwang21 (created on 2019/09/16)
# Version: 1, Last Modified: 2019/09/16 18:00
# https://github.com/skywind3000/awesome-cheatsheets
##############################################################################


##############################################################################
# 配置
##############################################################################
git config --global "Your Name"
git config --global "Email Address"
git config --global credential.helper store 保存密码(每次要输密码/重复输密码)


##############################################################################
# 初始化
##############################################################################
git init


##############################################################################
# 提交修改
##############################################################################
git add <file>
git add -u 提交work directory中所有已track的文件至staging area
git commit -m "descriptions"
git commit --amend 对最近一次的提交做内容修改
git commit --amend --author "user_name <user_email>" 修改最近提交用户名和邮箱


##############################################################################
# 查看状态、比对
##############################################################################
git status
git status -s 文件状态缩略信息, 常见 A:新增; M:文件变更; ?:未track; D:删除
git diff <file>
git diff HEAD -- <file> 查看工作区和版本库里面最新版本的区别
git diff --check <file> 检查是否有空白错误(regex:' \{1,\}$')
git diff --cached <file> 查看已add的内容(绿M)
git diff branch1 branch2 --stat 查看两个分支差异
git diff branch1 branch2 <file...> 查看分支文件具体差异

##############################################################################
# 查看历史版本、历史操作
##############################################################################
git log
git reflog
git log -n 最近n条的提交历史
git log <branch_name> -n 分支branch_name最近n条的提交历史
git log --stat 历次commit的文件变化
git log --shortstat 对比--stat只显示最后的总文件和行数变化统计(n file changed, n insertions(+), n deletion(-))
git log --name-status 显示新增、修改、删除的文件清单
git log lhs_hash..rhs_hash 对比两次commit的变化(增删的主语为lhs, 如git log HEAD~2..HEAD == git log HEAD -3)
git log -p 历次commit的内容增删
git log -p -W 历次commit的内容增删, 同时显示变更内容的上下文
git log origin/EI-1024 -1 --stat -p -W 查看远端分支EI-1024前一次修改的详细内容
git log origin/master..dev --stat -p -W 查看本地dev分支比远端master分支变化(修改)的详细内容

git log <branch_name> --oneline 对提交历史单行排列
git log <branch_name> --graph 对提交历史图形化排列
git log <branch_name> --decorate 对提交历史关联相关引用, 如tag, 本地远程分支等
git log <branch_name> --oneline --graph --decorate 拼接一下, 树形化显示历史
git log --graph --pretty=format:'%Cred%h%Creset -%C(yellow)%d%Creset %s %Cgreen%ai(%cr) %C(bold blue)<%an>%Creset' --abbrev-commit 同上, 建议alais保存

git log --pretty=format 常用的选项(摘自progit_v2.1.9)
%H 提交对象(commit)的完整哈希字串
%h 提交对象的简短哈希字串
%T 树对象(tree)的完整哈希字串
%t 树对象的简短哈希字串
%P 父对象(parent)的完整哈希字串
%p 父对象的简短哈希字串
%an 作者(author)的名字
%ae 作者的电子邮件地址
%ad 作者修订日期(可以用 --date= 选项定制格式)
%ar 作者修订日期,按多久以前的方式显示
%cn 提交者(committer)的名字
%ce 提交者的电子邮件地址
%cd 提交日期
%cr 提交日期,按多久以前的方式显示
%s 提交说明

git log --since --after 显示时间之后的提交
git log --until --before 显示时间之前的提交
git --author 显示指定作者的提交
git --committer 显示指定committer的提交(注:committer不一定是author)
git log -S [keyword] 仅显示添加或移除了某个关键字的提交(某些场景比单独git log -p | grep [keyword] 好用很多)
git log origin/b3.3/master --author=yx-ren --since="2019-10-01" --before="2019-11-01" 查看某作者在某发布版本最近一个月的提交, 常见于线上背锅
git log origin/b3.0/master --author=some_leave --since="1 month ago" 查看某刚离职同事过去一个月的提交, 常见于背锅
git log --since=1.weeks 过去一周的提交(写周报的时候可以看看我这一周干了啥)
git log --since=1.days 过去一天的提交(下班的时候可以看看我这一天干了啥)
git log --since="1 weeks 2 days 3 hours 40 minutes 50 seconds ago" 过去123小时4050秒之内的提交


##############################################################################
# 版本回退、前进
##############################################################################
git reset --hard HEAD^ 回退到上1版本
git reset --hard HEAD~5 回退到上5个版本
git reset --hard id 回退到指定版本


##############################################################################
# 撤销修改
##############################################################################
git checkout -- <file> 撤销修改:误修改工作区文件,未git add/commit
git restore <file> 撤销修改:误修改工作区文件,未git add/commit
git reset HEAD <file> 撤销git add:误将文件加入暂存区(git add),未git commit
git reset --hard HEAD^ 撤销git commit:误将文件提交(一旦提交,只能通过版本回退进行撤销)


##############################################################################
# 删除与恢复
##############################################################################
git rm/add <file>
git commit -m "remove <file>" 删除版本库中的<file>:删除工作区文件后,继续删除版本库中相应的文件
git checkout -- <file> 根据版本库中的<file>恢复工作区<file>
git restore <file> 对于 checkout -- <file> 的新写法 (2.23 引入)

##############################################################################
# 清理工作区未track也未ignore的文件或文件夹(如各种临时.swp, .patch文件等)
##############################################################################
git clean -i #交互式清理, 不常用
git clean -n #查看清理文件列表(不包括文件夹), 不执行实际清理动作
git clean -n -d #查看清理文件列表(包括文件夹), 不执行实际清理动作
git clean -f #清理所有未track文件
git clean -df #清理所有未track文件和文件夹, 常用, 但使用前确保新增加的文件或文件夹已add, 否则新创建的文件或者文件夹也会被强制删除

##############################################################################
# 关联GitHub远程仓库(本地到远程)
##############################################################################
git remote add origin <remote address> 在本地工作区目录下按照 GitHub 提示进行关联
git remote rm origin 解除错误关联
git push -u origin master 第一次将本地仓库推送至远程仓库(每次在本地提交后进行操作)
git push origin master 以后每次将本地仓库推送至远程仓库(每次在本地提交后进行操作)
<remote address>:
[email protected]:<username>/<repository>.git
https://github.com/<username>/<repository>.git


##############################################################################
# 克隆GitHub远程仓库(远程到本地)
##############################################################################
git clone <remote address> git协议速度更快但通常公司内网不允许,https协议速度慢


##############################################################################
# 分支管理:创建、切换、查看、合并、删除
##############################################################################
git branch <branch name> 创建<branch name>分支
git checkout <branch name> 切换至<branch name>分支
git switch <branch name> 切换至<branch name>分支 (2.23 引入)
git checkout -b <branch name> 创建并切换至<branch name>分支
git switch -c <branch name> 创建并切换至<branch name>分支
git branch 查看已有分支(* 表示当前分支)
git merge <branch name> 合并<branch name>到当前分支(通常在master分支下操作)
git merge --no-commit <branch name> 合并<branch name>到当前分支,但不提交
git branch -d <branch name> 删除分支
git branch -m oldbranchname newname 重命名分支


##############################################################################
# 解决合并冲突
##############################################################################
合并时报错“分支发生冲突”,首先vim相应文件,修改冲突位置,然后按照git add/commit重新提交,最后删除多余分支即可。
git log --graph --pretty=oneline --abbrev-commit
git log --graph


##############################################################################
# 分支管理:合并后删除分支也在 log 中保留分支记录
##############################################################################
git merge --no-ff -m "descriptions" <branch name>


##############################################################################
# 开发流程:
##############################################################################
master分支 发布稳定版本
dev分支 发布开发版本
<developer name>分支 个人开发分支(个人开发完成将该分支并入dev,同时保留该分支,继续开发)


##############################################################################
# Bug分支管理(建立单独分支进行bug修复)
##############################################################################
软件开发中,bug就像家常便饭一样。有了bug就需要修复,在Git中,由于分支是如此的强大,所以,每个bug都可以通过一个新的临时分支来修复,修复后,合并分支,然后将临时分支删除。
git stash 保存当前工作现场(在dev未完成开发,但master有bug需要修复)
git stash pop 回到dev分支后恢复工作现场(list中的现场会同时被删除)
git stash list 查看当前存储的工作现场
git stash apply stash@{#} 回到指定工作现场(list中的现场不会被删除,需要用git stash drop)
git stash drop stash@{#} 删除指定工作现场
git cherry-pick <id> 在master修复好bug后,在dev复制一遍bug修复流程


##############################################################################
# Feature分支管理(建立单独分支添加新功能)
##############################################################################
软件开发中,总有无穷无尽的新的功能要不断添加进来。添加一个新功能时,你肯定不希望因为一些实验性质的代码,把主分支搞乱了,所以,每添加一个新功能,最好新建一个feature分支,在上面开发,完成后,合并,最后,删除该feature分支。
git branch -D <branch name> 强制删除分支(丢弃未合并分支)


##############################################################################
# 协作与分支推送
##############################################################################
User 1:
git remote [-v] 查看远程库信息(-v 查看详细信息)
git remote update origin --prune 更新分支列表(更新远程分支列表)
git remote update origin -p 更新分支列表(更新远程分支列表)
git push origin [master/dev/...] 推送指定分支到远程
User 2:
git clone <remote address> 克隆到本地(只能克隆master)
git checkout -b dev origin/dev 本地新建分支并关联远程
git add/commit/push 添加、提交、推送更新
User 1:
git add/commit/push 推送时报错(与user 2推送的更新冲突)
git pull <remote> <branch>
git branch --set-upstream-to=origin/<branch> <branch> 本地与远程关联
git pull 拉取远程文件(并解决冲突)
git commit/push 重新提交并推送


##############################################################################
# 标签管理(常用于版本管理):查看、创建、操作
##############################################################################
git tag 查看标签
git show <tag name> 查看指定标签
git log --pretty=oneline --abbrev-commit --decorate=full 在log中显示标签
git tag <tag name> 为上次commit位置打标签
git tag <tag name> <commit id> 为指定commit位置打标签
git tag -a <tag name> -m "descriptions" <commit id> 为指定commit打标并添加描述
git tag -d <tag name> 删除本地标签
git push origin <tag name> 推送指定标签到远程
git push origin --tags 推送所有本地标签到远程
git push origin :refs/tags/<tag name> 删除远程标签(先删除本地标签)

##############################################################################
# rebase(换基)
##############################################################################
# rebase 在日常中常用功能主要是两个, 多人协同开发定期rebase master以及压缩某分支多个commit
git rebase master 常见于多人开发, 每个开发人员从master checkout出自己的分支, 开发一段时间后提交至master之前最好rebase一下, 防止冲突,
就算真有冲突在本地解决好过强制提交, 开发流程中尽量保证master的干净整洁

举个例子:
master分支上有三个提交C1, C2, C3
某一时刻usr1在C3的master分支上checkout出新的分支, 用于开发服务端支持ipv6新特性, 并提交了C4, C5
git checkout -b ipv6_support
......
git commit -m C4
......
git commit -m C5
此时提交状态如下所示
(origin/master branch)
|
C1 <- C2 <- C3
\
\
\
C4 <- C5
|
(ipv6_support branch)

某同事usr2修改了master上的内存泄漏错误, 并提交了C6, C7, C8三个commit, 然后直接推送origin/master(假设这个期间无其他人推新内容到master)
此时提交状态如下所示
(origin/usr2/fix_mem_leak branch)
|
C1 <- C2 <- C3 <- C6 <- C7 <- C8
\ |
\ (origin/master branch)
\
C4 <- C5
|
(ipv6_support branch)

如果此时usr1希望将ipv6的新特性提交至master, 那么在其直接push origin master时会提示master需要合并分支ipv6_support
虽然C4, C5的改动内容完全独立于C6, C7, C8的改动
但git仍会抓取C5和C8的提交并产生一个新的C9 commit(因两者分支的base不同), 如下图所示
C1 <- C2 <- C3 <- C6 <- C7 <- C8
\ \
\ \
\ \
C4 <- C5 <------ C9

如果是为了保证master提交记录的"干净完整"
或者是某分支不着急提交, 仍需要更多的测试与开发, 但又不想分支开发周期结束后"偏离"当初checkout的master分支太久远(容易造成更多的冲突)
可以考虑(定期)利用rebase来进行变基
即上面提到过的多人协同开发, 定期rebase master是个好习惯
git checkout ipv6_support
git rebase master
结果提交状态如下所示
(origin/master origin/usr2/fix_mem_leak branch)
|
C1 <- C2 <- C3 <- C6 <- C7 <- C8
\
\
\
C4' <- C5'
|
(ipv6_support branch)
这种rebase在功能上类似将某分支所有的改动做成多个patch并依次打在指定的新base上
此时再提交master就不会产生抓取效果, 会将C4'和C5'直接提交至master, 即can be fast-forwarded, 同时也保证了master提交记录的整洁性
(注: 虽然C4'和C5'的内容和C4, C5完全一致, 但两者base不同, commit hash code也完全不同)

git rebase --noto <branch_lhs> <branch_rhs> #重放, 用于变基在分支branch_lhs中而不在branch_rhs中的commit
#某项目状态分支如下所示, 其中Cn的数字代表提交时间顺
# T1 某员工urs1从C2(master分支)checkout出一个新的分支用于开发某基础公共组件功能
# T2 员工usr1开发完毕提交C3, 然后继续在该分支上(或checkout -b server)开发服务端相关功能, 并提交C4
# T3 master分支有更新, 其他同事usr2提交了C5, C6并推送到了origin master
# T4 员工usr1从server分支切回到C3公共基础的提交, 并创建新分支client, 用于开发客户端功能, 并提交C8, C9
# T5 员工usr1从client分支切回到server分支继续开发服务端功能, 并提交C10
(master branch)
|
C1 <- C2 <- C5 <- C6
\
\
\
C3 <- C4 <- C10
\ |
\ (server branch)
\
C8 <- C9
|
(client branch)

# 此时该员工希望将客户端相关的功能合并到主分支并发布,但暂时并不想合并 server 中的修改,因为它们还需要经
# 过更全面的测试。 这时可以使用 git rebase 命令的 --onto 选项,选中在 client 分支里但不在
# server 分支里的修改(即 C8 和 C9),将它们在 master 分支上重放:

git rebase --noto client server
# 得到如下图所示的提交状态
# 注:其中C3', C8', C9'与C3, C8, C9的提交内容完全一样, 但是hash id是完全不同的
(master branch)(client branch)
| |
C1 <- C2 <- C5 <- C6 <- C8' <- C9'
\
\
\
C3 <- C4 <- C10
\ |
\ (server branch)
\
[#####disable######]
[ C8 <- C9 ]
[ | ]
[ (client branch) ]

#can be fast-forwarded
git checkout master
git merge client
# 提交后分支状态如下
(client branch)
|
C1 <- C2 <- C5 <- C6 <- C3' <- C8' <- C9'
\ |
\ (master branch)
\
C3 <- C4 <- C10
|
(server branch)

git rebase -i HEAD~n 压缩当前分支的n个commit并合并为1个commit, 常见第一行为pick, 剩下的n-1行为squash

git rebase --abort # rebase过程中发生错误, 可以利用该命令终止整个rebase过程
git rebase --continue # rebase过程中发生冲突, 在解决冲突后可以利用该命令进行后续过程

##############################################################################
# 打patch(补丁)
##############################################################################
# 生成diff patch文件(git可以识别diff文件)
git <branch> log -n -p > diff.patch # 生成某分支过去n个commit的文件diff信息至单个diff文件
git diff <--cached> diff.patch # 针对当前缓存区的内容生成diff文件

# 利用apply打patch
git apply --check diff.patch #检查是否可以正常应用, 无回显证明无冲突
git apply --stat diff.patch #查看应用diff文件后的文件变化
git apply diff.patch #打patch, 仅仅改变文件信息, 无commit信息, 仍然需要add, commit

# 利用--format-patch生成patch, 带commit信息
git format-patch <branch> -n   #生成分支<branch>最近的n次commit的patch
git format-patch <r1>..<r2> #生成两个commit间的修改的patch(包含两个commit. <r1>和<r2>都是具体的commit号)
git format-patch -1 <r1> #生成单个commit的patch
git format-patch <r1> #生成某commit以来的修改patch(不包含该commit)
git format-patch --root <r1>  #生成从根到r1提交的所有patch

# 利用am打patch
git apply --check 0001-update-bash.sh.patch #检查patch是否冲突可用
git apply --stat 0001-update-bash.sh.patch #检查patch文件变更情况, 无回显证明无冲突
git am 0001-update-bash.sh.patch #将该patch打上到当前分支, 带commit信息
git am ./*.patch #将当前路径下的所有patch按照先后顺序打上
git am --abort #终止整个打patch的过程, 类似rebase --abort
git am --resolved #解决冲突后, 可以执行该命令进行后续的patch, 类似rebase --continue

##############################################################################

##############################################################################
# bundle(打包)
##############################################################################
# 该命令会将git工程打包, 默认情况下会打包所有commit记录和track的文件
# 不同于简单粗暴tar.gz打包整个文件夹, bundle只打包那些push过的记录
# 如某git工程下存在.build构建后的目录, 而.gitignore又忽略了该文件夹
# 如果利用tar.gz打包则会将那些忽略的文件文件夹一并打包, 可能会造成压缩包极大的臃肿
# 而又不想仅仅为了打个包就删除整个build目录(如重新build时间成本太大)
# 那么就可以使用bundle进行打包, 该命令只打包track过的文件
# 并且像url那样直接调用git clone来重建
git bundle create awesome-cheatsheets.bundle HEAD master #打包重建master分支的所有数据
git clone awesome-cheatsheets.bundle # 重建工程

# bundle也可以打包指定的区间, 至于提交区间有多种表示方式
git bundle create awesome-cheatsheets.bundle HEAD~10
git bundle create awesome-cheatsheets.bundle HEAD~10..HEAD
git bundle create awesome-cheatsheets.bundle lhs_commit_md5..rhs_commit_md5
git bundle create awesome-cheatsheets.bundle origin/master..master
git bundle create awesome-cheatsheets.bundle master ^origin/master


##############################################################################
# 使用GitHub
##############################################################################
fork --> clone --> add/commit/push --> pull request


##############################################################################
# 其他配置
##############################################################################
git config --global color.ui true 显示颜色


##############################################################################
# 配置.gitignore文件
##############################################################################
/<dir name>/ 忽略文件夹
*.zip 忽略.zip文件
/<dir name>/<file name> 忽略指定文件


##############################################################################
# 文件.gitignore生效后
##############################################################################
git add -f <file> 强制添加
git check-ignore -v <file> 查看生效规则


##############################################################################
# 配置别名
##############################################################################
git config [--global] alias.<alias> '<original command>' 为所有工作区/当前工作区配置别名
.git/config 当前工作区的配置文件
~/.gitconfig 当前用户的配置文件


##############################################################################
# References
##############################################################################
https://www.liaoxuefeng.com/wiki/896043488029600
https://git-scm.com/book/en/v2

##############################################################################
# 子模块
##############################################################################
git submodule foreach git pull 子模块更新


Git Notes
http://snowed.cn/2023/12/08/Git/
Author
Snowed16
Posted on
December 8, 2023
Updated on
December 24, 2024
Licensed under