1. Terminal 1. Bash和Zsh的区别 (见第一章 Shell 1.Shell 简介)
二者均是shell的一种,zsh能基本完美兼容bash的命令,并且使用起来更加优雅。由于bash或zsh本质上都是解释器,他们所共同服务的是shell语言,因此在命令语法上基本相同,部分兼容性差异可参考:bash - Zsh和Bash的兼容性问题_个人文章 - SegmentFault 思否
1
2
cat /etc/shells #查看系统支持的shell
zsh安装看下一章节
二者切换:
切换bash: chsh -s /bin/bash
切换zsh: chsh -s /usr/bin/zsh
在终端app的系统偏好设置里手动设置。
在配置文件方面:
bash读取的配置文件:~/.bash_profile文件
zsh读取的配置文件:~/.zshrc文件
当从bash切换为zsh时,如果不想重新配置一遍.zshrc文件,可以_在.zshrc文件中加上source ~/.bash_profile,从而直接从.bash_profile文件读取配置。
2. 常用命令 1. 端口情况
查看端口被哪个程序占用
(port替换成端口号,比如6379)可以查看该端口被什么程序占用,并显示PID,方便KILL(kill pid)
看到进程的PID,可以将进程杀死。
2. 应用位置 3. 设置代理 .zshrc
1
2
3
4
5
6
7
8
9
10
11
12
13
14
15
16
function proxy_on() {
3. ssh 1 2 3 4 5 6 7 8 9 10 11 12 13 14 15 16 17 18 19 20 21 22 23 24 25 26 27 28 29 30 31 32 33 34 35 36 37 38 39 40 41 42 43 44 45 46 47 48 49 50 51 52 53 54 55 56 57 58 59 # # 常用命令:SSH / 系统信息 / 网络 # # [email protected] :/mnt/mmcblk2p4#
免密登录远程服务器:
本地和远程机器均执行操作:
二者的目录/Users/snowed16/.ssh/下均有生成的密钥 id_rsa、公钥id_rsa.pub,服务器(ubuntu)另有 authorized_keys.
将本地id_rsa.pub的内容复制到远程 authorized_keys文件中,即可实现密码登录。
4. clash 原文地址:Linux使用clash (wlzs.cn)
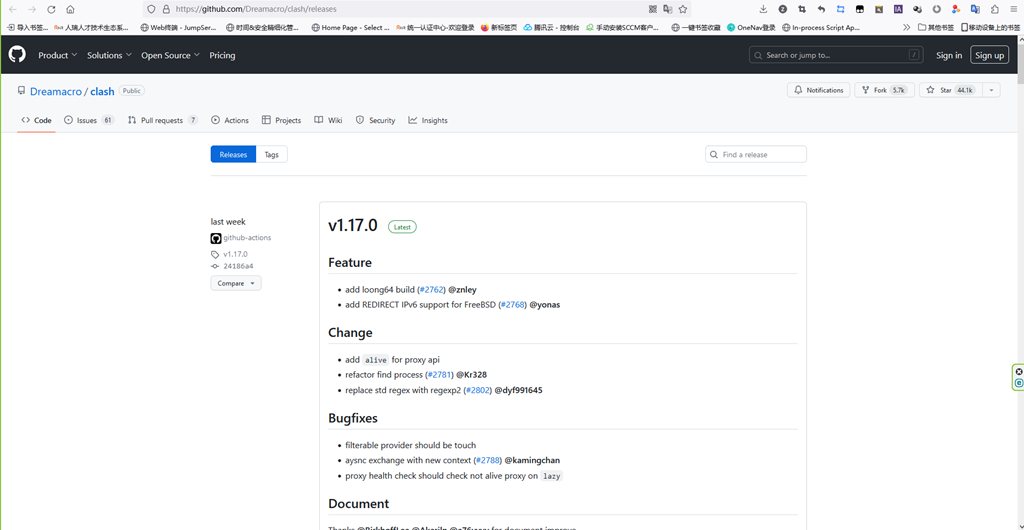
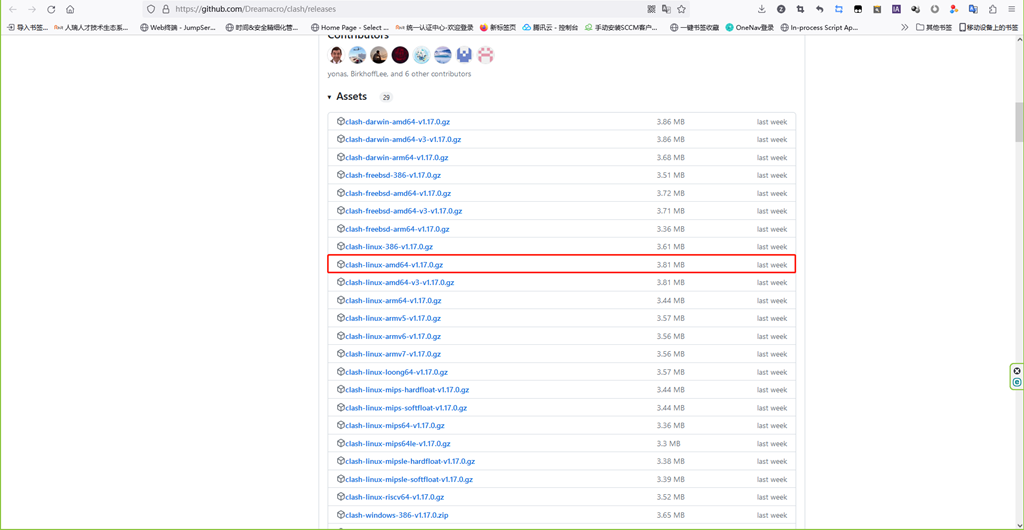
1. 下载clash clash下载地址:https://github.com/Dreamacro/clash/releases
选择匹配的版本进行下载,此次环境为Linux环境。
将下载的包上传至Linux系统,或者直接使用wget下载链接下载至系统
1 wget https://github.com/Dreamacro/clash/releases/download/v1.17.0/clash-linux-amd64-v1.17.0.gz
2. 安装clash 1 2 3 4 5 6 7 [root@localhost ~]# gzip -d clash-linux-amd64-v1.1
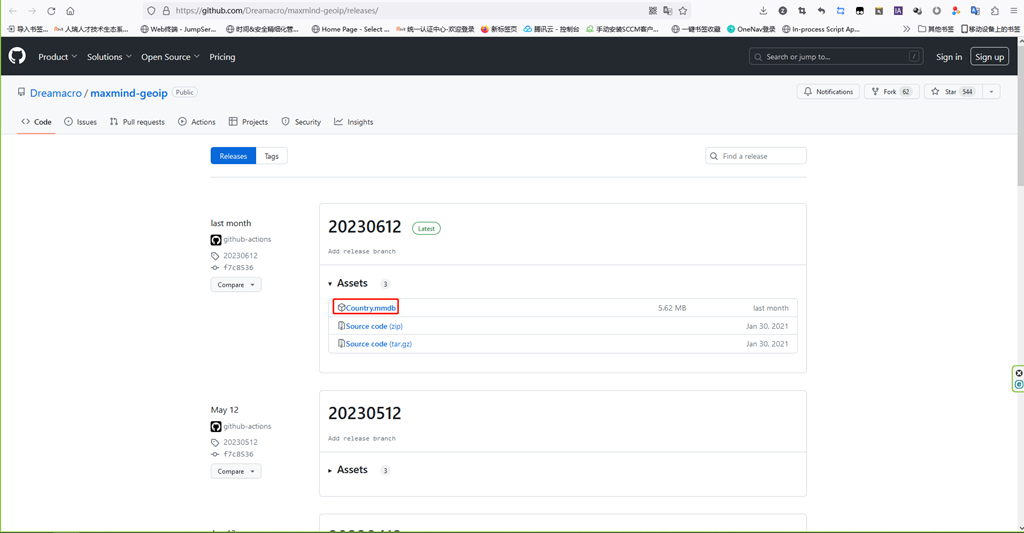
3. 下载文件 Country.mmdb 地理数据库
下载地址:https://github.com/Dreamacro/maxmind-geoip/releases/
下载完毕后,上传至/usr/local/clash目录下,也可以使用wget直接下载。
1 2 3 root@localhost clash]# wget https://github.com/Dreamacro/maxmind-geoip/releases/download/20230612/Country.mmdb
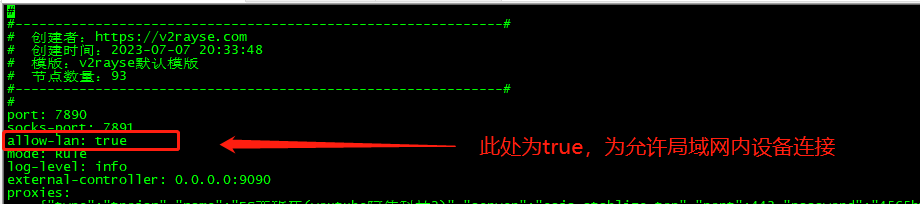
4. 配置订阅文件 1 2 3 [root@localhost clash]# wget [-P /usr/local/] -O config.yaml 订阅url
编辑订阅文件(vi config.yaml),允许局域网设备连接(可选)
5. Systemd管理 添加clash服务
1 2 3 4 5 6 7 8 9 10 11 12 13 14 15 16 17 18 19 20 21 22 23 24 25 26 27 28 29 30 31 32 33 [root@localhost clash]# vi /etc/systemd/system/clash.service# systemctl disable clash.service # systemctl enable clash.service
查看端口是否正常开放
1 [root@localhost clash]# ss -tnlp | grep 7890 LISTEN 0 4096 *:7890 *:* users:(("clash",pid=2451,fd=19))
代理测试
1 curl -x http://127.0.0.1:7890 https://www.youtube.com/
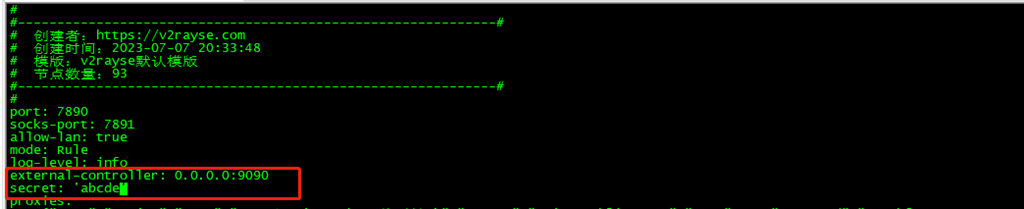
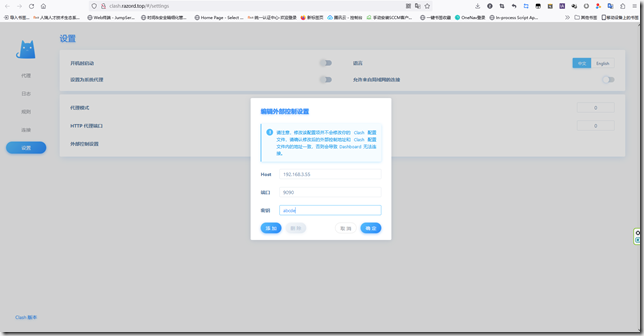
6. 网页管理clash 编辑配置文件中的external-controller可以设置端口号,该端口号需要防火墙放行,secret可以设置管理密钥。
访问网页管理
clash 、yacd
7. 端口设置 如果clash本地系统使用,则地址使用127.0.0.1,如果局域网机器使用则需要使用安装clash软件的IP地址,并且需要开放代理端口,此案例使用本地地址。
编辑home目录下的.zshrc文件,在文件最尾端增加以下内容,重新连接即可。
1 2 3 4 5 6 7 8 9 10 11 12 alias ss-start='
2. Zsh 插件 1. oh- my-zsh ohmyzsh/ohmyzsh
1 sh -c "$(curl -fsSL https://raw.githubusercontent.com/ohmyzsh/ohmyzsh/master/tools/install.sh)"
2. powerlevel10k: romkatv/powerlevel10k: A Zsh theme (github.com)
Clone the repository:
1 git clone --depth=1 https://github.com/romkatv/powerlevel10k.git ${ZSH_CUSTOM:-$HOME/.oh-my-zsh/custom}/themes/powerlevel10k
Users in China can use the official mirror on gitee.com for faster download.
1 git clone --depth=1 https://gitee.com/romkatv/powerlevel10k.git ${ZSH_CUSTOM:-$HOME/.oh-my-zsh/custom}/themes/powerlevel10k
Set ZSH_THEME="powerlevel10k/powerlevel10k" in ~/.zshrc.
3. autojump wting/autojump: A cd command that learns - easily navigate directories from the command line (github.com)
4. autosuggestions zsh-users/zsh-autosuggestions: Fish-like autosuggestions for zsh (github.com)
Clone this repository into $ZSH_CUSTOM/plugins (by default ~/.oh-my-zsh/custom/plugins)
1 git clone https://github.com/zsh-users/zsh-autosuggestions ${ZSH_CUSTOM:-~/.oh-my-zsh/custom}/plugins/zsh-autosuggestions
Add the plugin to the list of plugins for Oh My Zsh to load (inside ~/.zshrc):
1 2 3 4 plugins=(
Start a new terminal session.
5. zsh-syntax-highlighting zsh-users/zsh-syntax-highlighting: Fish shell like syntax highlighting for Zsh. (github.com)
Iterm2:
1 brew install zsh-syntaax-highlighting
zsh:
Clone this repository in oh-my-zsh’s plugins directory:
1 git clone https://github.com/zsh-users/zsh-syntax-highlighting.git ${ZSH_CUSTOM:-~/.oh-my-zsh/custom}/plugins/zsh-syntax-highlighting
Activate the plugin in ~/.zshrc:
1 plugins=( [plugins...] zsh-syntax-highlighting)
Restart zsh (such as by opening a new instance of your terminal emulator).
6. Homebrew 1 2 3 /bin/bash -c "$(curl -fsSL https://raw.githubusercontent.com/Homebrew/install/HEAD/install.sh)"
阿里巴巴开源镜像站:阿里巴巴开源镜像站-OPSX镜像站-阿里云开发者社区 (aliyun.com)
一、brew 安装脚本 (自动选择软件源)
/bin/zsh -c “$(curl -fsSL https://gitee.com/cunkai/HomebrewCN/raw/master/Homebrew.sh )”
二、brew 卸载脚本
/bin/zsh -c “$(curl -fsSL https://gitee.com/cunkai/HomebrewCN/raw/master/HomebrewUninstall.sh )”
三、常用命令
1 2 3 4 5 6 7 8 9 10 11 12 13 14 15 16 17 18 19 20 21 22 23 24 25 26 27 28 29 30 31 32 33 34 35 36 37 38 39 40 41 42 43 44 45 46 47 48 49 50 51 52 53 54 55 56 57 58 59 60 61 62 63 //查看brew的版本
7. tree & watch 8. Privoxy ERROR:注意三个空格
9. pyenv 1. 说明 目前Python同时更新与维护Python2和Python3,选择Python2还是选择Python3,取决于当前要使用的库、框架支持哪个版本,所以经常会遇到切换版本的情况。
那么应该怎样有效的更改呢?很多小伙伴一定会想到修改环境变量,指定Python的默认路径,这样当然可以,然而不够优雅。那么怎样的方法才算优雅呢?当然是一条命令了👻。
这里通过brew安装pyenv,再用pyenv安装管理Python。
2. 安装步骤
安装homebrew:🚀
1 2 3 4 5 $ /usr/bin/ruby -e "$(curl -fsSL https://raw.githubusercontent.com/Homebrew/install/master/install)" $ brew -vHomebrew 1.6 .9 Homebrew /homebrew-core (git revision 5707e; last commit 2018 -07 -09)
注:Homebrew 是macOS下非常高效的命令行软件包管理器,mac必安装工具之一。
安装pyenv:🛰
1 2 3 4 5 $ brew update$ brew install pyenv$ pyenv -v1.2 .5
安装管理多个Python:
1 2 3 4 5 6 7 $ pyenv install 2.7 .15 $ pyenv install 3.7 .0 $ pyenv versions2.7 .15 3.7 .0 (set by /Users /john/.pyenv/version)
注:星号指定当前的版本
切换版本:
1 2 3 4 5 6 7 8 $ pyenv global 2.7 .15 2.7 .15 (set by /Users/john/.pyenv/version)3.7 .0 2.7 .15
pyenv常用的命令说明:
1 2 3 4 5 6 7 8 9 10 11 12 使用方式: pyenv <命令> [<参数>]local 设置或显示本地的Python版本which 显示安装路径
注:使用local、global、shell,设置Python版本时需要跟上参数(版本号),查看则不需要。
【pyenv】解决 pyenv install 国内下载缓慢的问题
1 2 3 4 wget https://registry.npmmirror.com/-/binary/python/3.9.0/Python-3.9.0.tar.xz -P ~/.pyenv/cache/
原理是先把安装包下载到缓存里,install 时会自动检测。将版本号替换为自己要下载的版本即可。
或者用代理
3. pyenv的安装和使用 Homebrew安装 pyenv
1 2 3 brew update
配置shell环境,这里有一个坑点,第一条是pyenv去年新增的命令,网上许多文章没有,导致pyenv的版本控制无法正常使用
1 2 3 echo 'eval "$(pyenv init --path)"' >> ~/.zprofileecho 'eval "$(pyenv init -)"' >> ~/.zshrc
重新打开终端,或者执行以下命令加载pyenv的配置
1 2 3 source ~/.zprofilesource ~/.zshrc
查看配置成功没,通过查看环境变量$PATH中是否有/Users/[用户名]/.pyenv/shims
1 2 3 pyenv install 3.8.13
查看已安装的Python版本
pyenv global 设置全局版本
1 2 pyenv global 3.8.13 2.7.18
根据设置版本的前后来决定python解析的是哪个,前面的版本为3.8.13所以优先解析它
1 2 3 4 5 6 7 8 9 10 ➜ ~ python --versionwhich python3which python
4. Pyenv无法安装问题 10. jenv 在这篇指南中,我们将完成使用jEnv 命令行工具来管理MacOS系统中的三个JDK版本(Java8、Java11和Java17),大致流程为:
使用MacOS的包管理工具Homebrew安装JDK环境变量管理工具jEnv
使用Homebrewan安装多个JDK版本
将多个Java版本的路径加入jEnv
通过jEnv命令设置全局、项目和shell的Java版本
所有涉及的工具清单如下:
Homebrew ,Homebrew是一个免费的MacOS包管理工具,我们用它来安装JDK和JDK版本管理工具jEnv ,jEnv是一个让你不需要记住如何设置JAVA_HOME环境变量的命令行工具,我们将用它来管理系统中的JDK版本
1. 安装步骤 安装Homebrew 在MacOS上安装Homebrew,可以参考MacOS包管理工具-Homebrew
安装jEnv 输出:
1 2 3 4 5 6 7 8 9 10 11 12 13 14 15 16 Running `brew update --preinstall`...# #
按照输出提示,我们需要将以下配置加入我们的shell配置文件中(如果系统使用的shell是bash,就将其加入~/.bash_profile或者~/.bashrc;如果使用的shell是zsh,就将其加入~/.zshrc文件中)。
1 2 export PATH="$HOME/.jenv/bin:$PATH"
我们可以直接将上述配置直接粘贴到shell配置文件中,也可以通过echo将其加入配置文件中:
1 2 echo 'export PATH="$HOME/.jenv/bin:$PATH"' >> ~/.zshrc
不管通过哪种方式完成配置后,我们需要使配置立即生效:
jEnv已经安装配置完成,我们可以通过jenv doctor命令验证一下:
输出:
1 2 3 4 5 6 [OK] No JAVA_HOME set
假如看到类似上面错误提示,暂且不用理会,因为我们还没将JDK添加到jEvn的管理中。如果我们在后续会使用到Maven还需要以下操作:
1 jenv enable-plugin export
输出
1 You may restart your session to activate jenv export plugin echo export plugin activated
1 jenv enable-plugin maven
输出
2. 安装Java 1 2 3 4 5 6 7 # 安装最新版OpenJDK $ brew install --cask temurin # 安装其他版本 $ brew tap homebrew/cask-versions $ brew install --cask temurin11 $ brew install --cask temurin8
3. 配置jEnv 把所有JDK加入jEnv管理 首先,查看系统中有哪些JDK版本:
1 /usr/libexec/java_home -V
输出:
1 2 3 4 5 Matching Java Virtual Machines (4):
然后,将所有JDK的路径加入到jEnv中,语法如下:
例如:
1 jenv add /Library/Java/JavaVirtualMachines/temurin-17.jdk/Contents/Home
查看下jEnv管理的所有JDK版本:
输出:
1 2 3 4 5 6 7 8 9 10 11 12 system
设置全局JDK版本 设置项目JDK版本 如果要为项目指定JDK版本,只需在项目根目录下使用以下命令即可,jEnv会在目录下生成.java-version文件来描述当前项目使用的JDK版本
设置shell的JDK版本 4. FAQ jEnv启用插件报错 问题信息
1 jenv: no such command `enable-plugin'
解决方案
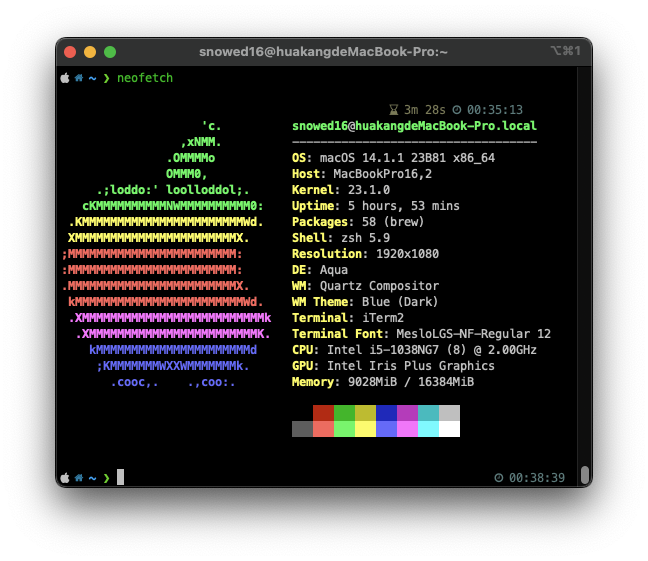
11. 系统信息 1. 系统快照工具 neofetch(图)、screenfetch
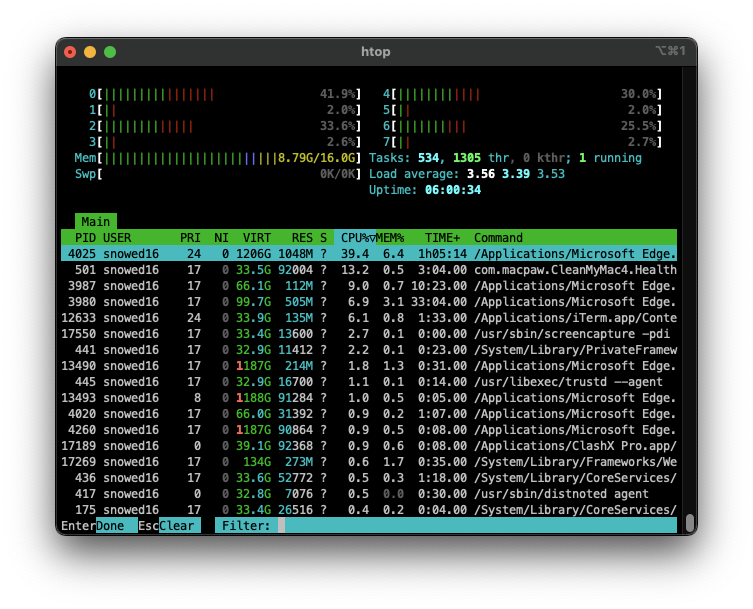
2. 实时监控 htop(图)、gotop
3. macos 1. xcode-select –install 重装xcode command line:xcode-select –install
如果没有解决问题,执行以下命令:sudo xcode-select -switch /
2. 禁止Dock 栏跳动 下面两条命令是禁用跳动和重启dock
1 2 defaults write com.apple.dock no-bouncing -bool TRUE
如果想要恢复跳动则运行以下两条即可
1 2 defaults write com.apple.dock no-bouncing -bool FALSE
3. Python error macos - mac os12.4 python: error: Failed to locate ‘python’ - Stack Overflow
4. wsl 1.网络设置
原文地址:WSL2 的 2.0 更新彻底解决网络问题 - 知乎 (zhihu.com)
开启方法:
更新系统版本到 23H2 (目前还没发正式版,可以考虑加入 Windows Insider 的 Release Preview 或者 Beta 预览版通道)。或者如果不想加入预览版计划的话你也可以等几周,23H2 也快发布正式版了。
wsl --update --pre-release 把 WSL2 更新到 2.0.0 或以上版本在 %userprofile%\.wslconfig 中写入以下内容然后保存:
1 2 3 4 5 6 [experimental] networkingMode =mirroreddnsTunneling =true firewall =true autoProxy =true sparseVhd =true
然后运行 wsl --manage 发行版名字 --set-sparse true 启用稀疏 VHD 允许 WSL2 的硬盘空间自动回收,比如 wsl --manage Ubuntu --set-sparse true
然后你会发现,WSL2 和 Windows 主机的网络互通而且 IP 地址相同了,还支持 IPv6 了,并且从外部(比如局域网)可以同时访问 WSL2 和 Windows 的网络。这波升级彻底带回以前 WSL1 那时候的无缝网络体验了,并且 Windows 防火墙也能过滤 WSL 里的包了,再也不需要什么桥接网卡、端口转发之类的操作了。并且 WSL2 的内存占用和硬盘空间都可以自动回收了!
另外,使用 VSCode - WSL 插件的,建议去 VSCode 设置里把自动端口转发关掉(Remote: Auto Forward Ports),避免冲突,因为 WSL2 更新之后新的网络已经是和你的 Windows 使用相同网络了,不再需要端口转发了。
最后,如果你在 WSL 里使用 docker,那需要将 autoMemoryReclaim 配置为 dropcache 或者 disabled,然后在 /etc/docker/daemon.json 里添加一句 "iptables": false ,否则你可能无法正常使用 docker。
2. git push 无响应 方法二 :如果22号端口不行,那就换一个端口
操作方法:
1.进入~/.ssh下
2.创建一个config文件
3.编辑文件内容:
1 2 3 4 5 6 7 8 9 10 11 12 13 14 Host github.com
4.保存退出
5.检查是否成功